# react 中的虚拟列表
# 什么是虚拟列表
虚拟列表是一种长列表的结局方案。 当后端返回的数据量比较多的时候,如果一次性加载在页面上,会使得 dom 元素比较多,加载起来比较慢,表现在页面上就是有点卡顿。 比较常见的就是 表格(当用户将分页调制500时), 长卡片展示时等。不管是在 vue 还是 react 中对于这种海量数据展示的情况都会出现卡顿的问题,究其原因就是一次性展示的dom数据过多。所以虚拟列表的出现就是为了解决大量dom带来的性能问题。
什么叫虚拟列表。就是在长列表滚动的过程中,只有用户看到的部分才是真实的dom, 而其他地方仅仅只是用 padding 或 div(height: 10000px) 撑起的视觉效果。 在用户滚动的过程中,将监听 scroll 事件 不断的截取相对应需要展示的 数据替换。从而达到模拟真实的滚动情况。让用户在视觉上感觉是列表在滚动,达到无限滚动的效果。
虚拟列表可以分为三个区域:视图去 + 缓冲区 + 虚拟区。而缓冲区 + 虚拟区实际也为一个区域,就是实际需要渲染的 dom 节点。一般来说这两个区域加在一起需要大于用户可看到的界面元素。看下面一张从网上拔下来的图你就可以一看便知:
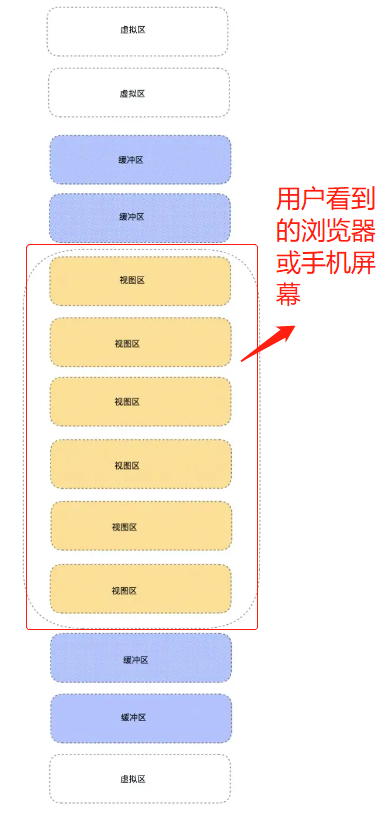
- 视图区:用户所看到的列表区,为实际的dom元素。
- 缓冲区: 缓冲区是为了防止用户上滑或者下滑过程中因滑动过快出现的白屏效果。 (上面说了,视图区 和 缓冲区为真实渲染的dom)
- 虚拟区:对于用户看不到的区域(除了缓冲区外),剩下的区域不用渲染真实dom,而是通过
padding或 用一个div给上其高度来模拟的。这样就可以有效的减少页面上实际的dom数量。
# 虚拟列表的实现思路
- 首先需要固定每个块的高度, 比如
60px。这样,假如后端返回给你 2000 条数据, 那就可以计算出总高度为60 * 2000 = 12000px。 - 然后我们最外围div一个固定高度
600px, 然后里面给一个元素overflow-y: auto;。 之后, 给里面一个div赋予 12000px 的高度 ,这样就创建出一个 12000px 滚动条的div 了。
// 大概是这样
<div style="height: 600px;">
  <div style="overflow-y: auto;">
    <div style="height: 12000px;"></div>
  </div>
</div>
1
2
3
4
5
6
2
3
4
5
6
- 然后我们监听滚动元素的
scroll事件, 根据scrollTop来计算渲染区域的偏移量和当前需要渲染的数据。
# react 中实现
import { useEffect, useState, useRef } from 'react';
import './App.css';


function App() {
  const [dataList, setDataList] = useState([]) // 所有数据源
  const [position, setPosition] = useState([0, 0])  /* 截取缓冲区 + 视图区索引 */
  const scroll = useRef(null) // scroll 元素
  const box = useRef(null) // 最外围容器
  const context = useRef(null) // 撑起高度的div
  const scrollInfo = useRef({
    height: 300,
    bufferCount: 8, // 缓冲区 数量
    itemHeight: 60, // 每个 块(卡片) 的高度
    renderCount: 0 // 视图区 数量
  })

  // 模拟 滑动到底部 请求接口 新增数据
  const pushData = () => {
    const len = dataList.length
    const newDataList = new Array(10).fill(1).map((item,index)=> index + 1 + len)
    setDataList([
      ...dataList,
      ...newDataList
    ])
  }

  // 初始化
  useEffect(() => {
    const height = box.current.offsetHeight
    const { bufferCount,  itemHeight } = scrollInfo.current
    // (height / itemHeight 计算 视图区可以展示的数量),
    // 加上 bufferCount 缓存区数量 为总的需要渲染的数量
    const renderCount = Math.ceil(height / itemHeight) + bufferCount
    scrollInfo.current = { ...scrollInfo.current, renderCount, height }

    // 模拟初始请求数据 , 也可以将其改成 new Array(2000) , 一次性请求2000条数据
    const dataList = new Array(10).fill(1).map((item,index)=> index + 1 )
    setDataList(dataList)

    // 初始化数据截取下表 截取 当前总数据量的 0 ~ renderCount 条数据
    setPosition([0, renderCount])
  }, [])


  // 滚动监听事件
  const handleScroll = () => {
    const { clientHeight, scrollTop, scrollHeight } = scroll.current
    const { itemHeight, renderCount } = scrollInfo.current

    // 偏移值计算 - (scrollTop % itemHeight) 很重要, 丝不丝滑 全看他了。
    // 你可以改成 const currentOffset = scrollTop 来比较
    // 原理就是 你滚动一次可能会触发很多次该事件,并且和滚动同步了,看上去好像只是文案改了,而不是滚动
    // 这样 取余之后, 只有当你滚动超过 一个 item 的高度时才会触发偏移
    const currentOffset = scrollTop - (scrollTop % itemHeight)

    // 截取数据开始下标
    const start = Math.floor(scrollTop / itemHeight)
    context.current.style.transform = `translate3d(0, ${currentOffset}px, 0)`;

    // 截取数据结束下标
    const end = Math.floor(scrollTop / itemHeight + renderCount + 1)

    // item 高度为60  你滚动了 30, 则不触发数据截取
    if (end !== position[1] || start !== position[0]) {
      setPosition([start ,end])
    }


    // 到底部了加载下一条数据
    if (scrollTop + clientHeight === scrollHeight) {
      console.log('到底部了');

      pushData()
    }
  }

  const { height, itemHeight } = scrollInfo.current
  return (
    <div className="App"  ref={box}>
     <div className="scroll" style={{height: height + 'px'}} ref={scroll} onScroll={handleScroll}>
        <div className="scroll_hold" style={{height: `${dataList.length * itemHeight}px`}}></div>
        <div className="context" ref={context}>
          {
            dataList.slice(position[0], position[1]).map((i, index) => {
              return <div className="item" style={{height: itemHeight + 'px'}} title={i} key={index}>
                <div className="item-box">
                  { i }-----item
                </div>
              </div>
            })
          }
        </div>
     </div>
    </div>
  );
}

export default App;
1
2
3
4
5
6
7
8
9
10
11
12
13
14
15
16
17
18
19
20
21
22
23
24
25
26
27
28
29
30
31
32
33
34
35
36
37
38
39
40
41
42
43
44
45
46
47
48
49
50
51
52
53
54
55
56
57
58
59
60
61
62
63
64
65
66
67
68
69
70
71
72
73
74
75
76
77
78
79
80
81
82
83
84
85
86
87
88
89
90
91
92
93
94
95
96
97
98
99
100
2
3
4
5
6
7
8
9
10
11
12
13
14
15
16
17
18
19
20
21
22
23
24
25
26
27
28
29
30
31
32
33
34
35
36
37
38
39
40
41
42
43
44
45
46
47
48
49
50
51
52
53
54
55
56
57
58
59
60
61
62
63
64
65
66
67
68
69
70
71
72
73
74
75
76
77
78
79
80
81
82
83
84
85
86
87
88
89
90
91
92
93
94
95
96
97
98
99
100
下面是css
* {
  font-size: 14px;
  margin: 0;
  padding: 0;
}
body {
  padding: 30px;
}
.App {
  width: 300px;
  height: 100%;
  border-radius: 4px;
}
.item {
  width: 100%;
  padding: 10px 10px;
}
.item-box {
  border-radius: 10px;
  background-color: red;
  display: flex;
  align-items: center;
  height: 100%;
}
.scroll {
  position: relative;
  border: 1px solid #333;
  overflow-y: auto;
}
.scroll_hold  {
  position: absolute;
  left: 0;
  top: 0;
  right: 0;
}
1
2
3
4
5
6
7
8
9
10
11
12
13
14
15
16
17
18
19
20
21
22
23
24
25
26
27
28
29
30
31
32
33
34
35
36
37
2
3
4
5
6
7
8
9
10
11
12
13
14
15
16
17
18
19
20
21
22
23
24
25
26
27
28
29
30
31
32
33
34
35
36
37
大家随便打开一个react 项目复制即可运行。当然,实际项目中可能会比较复杂,给大家一个参考代码。